はじめに
こんにちは.!! jack Advent Calendar 2023の14日目担当のマロンです。
学部3年生のjack3年生です。バックエンドが好き(というかフロントができない)で最近はGoを使っています。専攻は知能システムで、ちょいちょい機械学習の勉強もやってます。来年のJPHacksあたりでハードか機械学習やりたいな~という野望があります。
そんな私ですが、急遽CI/CDについて勉強しなければならない機会がありました. 勉強したみたところ、便利で面白い!と思ったので、ブログに書いて皆さんに共有したいと思います。
CI/CDとは
そもそもCI/CDとはなんでしょうか?。
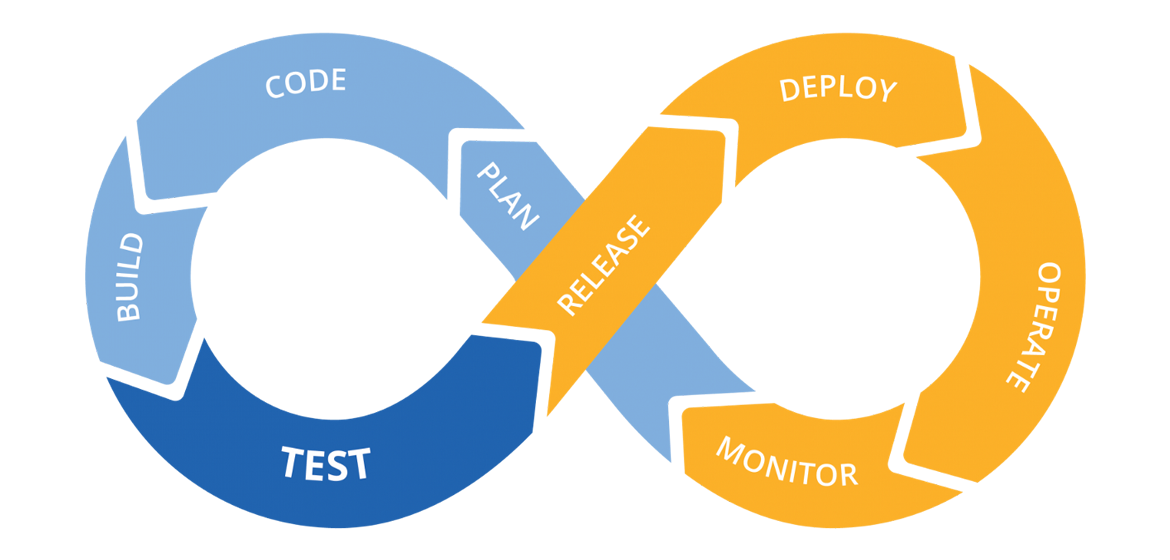
CI/CDとは「Continuous Integration / Continuous Delivery」または、「Continuous Integration / Continuous Deployment」の略です。日本語では継続的インテグレーション/継続的デリバリー/継続的デプロイと言われたりしています。DがDeliveryだったりDeploymentだったりするらしいです。
CI/CDとはソフトウェア開発プロセスの自動化手法で、新しいコードの絶え間ない統合と、本番環境への連続的な展開を可能にする手法のことです。
なぜ、コードの絶え間ない統合を行うのでしょうか?それにはこんな理由があります。
- コードをコミットする頻度が高いほどエラーの検出が早くなる
- こまめにコミットすると、毎回の差分が少量になるので、エラーが起きた時のエラーの原因の特定が容易になります。
- コードの更新が頻繁であれば、他のチームメンバーによる変更をマージするのも容易になる。
- 一気に変更をマージしようとして大量のコンフリクトが起きた経験…思い当たる方も少なくないのではないでしょうか?
GitHub Actionsとは
GitHub ActionsとはGitHubが提供しているCI/CDプラットフォームです。リポジトリに対するすべての pull request をビルドしてテストしたり、マージされた pull request を運用環境にデプロイしたりするワークフローを作成できます。多くの方がGitHubを利用していると思うので、今回はGitHubActionsを利用してCI/CDを体験してみましょう。
GitHub Actionsにはworkflows, event, job, action, runnerなどの用語がありますが、今回は試しにやってみよう!という記事なので詳細は割愛します。詳しく知りたい方は公式ドキュメントをご参照ください。
実践
1. リポジトリの作成
リポジトリを作成しましょう。Privateだとアカウントプランに応じた制限+超えた場合は課金っぽいのでPublicにするのがおすすめです。それ以外の項目は適当で大丈夫です。

2. Actionsの導入
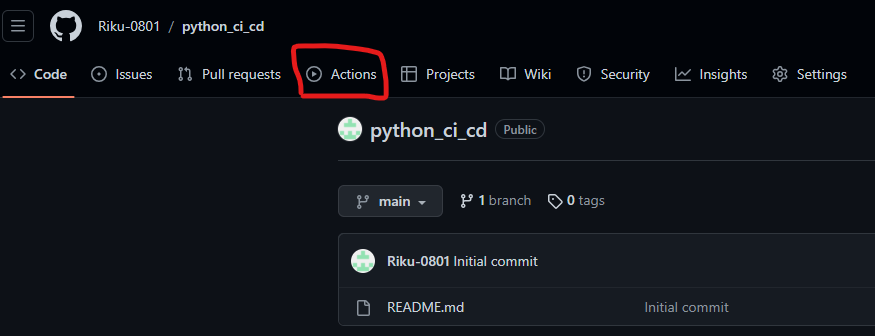
作成したリポジトリのページに移動し、Actionsのタブに移動しましょう。
Get Started with GitHub Actionsみたいな感じの画面が出ると思います。
そしたら画面にある検索バーに”Python”と入力してみましょう。
下の画像みたいに候補が大量に出てくると思います。今回は赤い線に囲まれた”Python appl
ication”を使って見ましょう!”Configure”を押してください。

押すと、下のようなymlファイルが出てきます。これがワークフロー(一連の流れ)の設定ファイルです。ワークフローは.github/workflows配下にあるymlファイルで定義されます。少し中身を見てみましょう。
# This workflow will install Python dependencies, run tests and lint with a single version of Python
# For more information see: https://docs.github.com/en/actions/automating-builds-and-tests/building-and-testing-python

name: Python application

on:
  push:
    branches: [ "main" ]
  pull_request:
    branches: [ "main" ]

permissions:
  contents: read

jobs:
  build:

    runs-on: ubuntu-latest

    steps:
    - uses: actions/checkout@v3
    - name: Set up Python 3.10
      uses: actions/setup-python@v3
      with:
        python-version: "3.10"
    - name: Install dependencies
      run: |
        python -m pip install --upgrade pip
        pip install flake8 pytest
        if [ -f requirements.txt ]; then pip install -r requirements.txt; fi
    - name: Lint with flake8
      run: |
        # stop the build if there are Python syntax errors or undefined names
        flake8 . --count --select=E9,F63,F7,F82 --show-source --statistics
        # exit-zero treats all errors as warnings. The GitHub editor is 127 chars wide
        flake8 . --count --exit-zero --max-complexity=10 --max-line-length=127 --statistics
    - name: Test with pytest
      run: |
        pytest
name: Python applicationGitHub リポジトリの "Actions" タブに表示されるワークフロー名です。多分なんでもいい。
on:
  push:
    branches: [ "main" ]
  pull_request:
branches: [ "main" ]このワークフローのトリガーを指定しています。今回はmainブランチにpushされたとき、とmainブランチにプルリクエストが作成されたときの2種類が設定されています。
jobs:
  build:

    runs-on: ubuntu-latest

    steps:
    - uses: actions/checkout@v3
    - name: Set up Python 3.10
      uses: actions/setup-python@v3
      with:
        python-version: "3.10"
    - name: Install dependencies
      run: |
        python -m pip install --upgrade pip
        pip install flake8 pytest
        if [ -f requirements.txt ]; then pip install -r requirements.txt; fi
    - name: Lint with flake8
      run: |
        # stop the build if there are Python syntax errors or undefined names
        flake8 . --count --select=E9,F63,F7,F82 --show-source --statistics
        # exit-zero treats all errors as warnings. The GitHub editor is 127 chars wide
        flake8 . --count --exit-zero --max-complexity=10 --max-line-length=127 --statistics
    - name: Test with pytest
      run: |
        pytest
ジョブという同じランナー(ワークフローがトリガーされると実行されるサーバー)で実行されるワークフロー内の一連のステップを定義しています。中身を見ていきましょう。
runs-on: ubuntu-latestジョブを最新版のUbnutu仮想マシンで実行しますよ~っていう設定です。詳しい内容はここにあるので是非読んでみてください。
steps:
    - uses: actions/checkout@v3
    - name: Set up Python 3.10
      uses: actions/setup-python@v3
      with:
        python-version: "3.10"
    - name: Install dependencies
      run: |
        python -m pip install --upgrade pip
        pip install flake8 pytest
        if [ -f requirements.txt ]; then pip install -r requirements.txt; fi
    - name: Lint with flake8
      run: |
        # stop the build if there are Python syntax errors or undefined names
        flake8 . --count --select=E9,F63,F7,F82 --show-source --statistics
        # exit-zero treats all errors as warnings. The GitHub editor is 127 chars wide
        flake8 . --count --exit-zero --max-complexity=10 --max-line-length=127 --statistics
    - name: Test with pytest
      run: |
        pytest
ジョブで実行するステップの定義です。
usesは何のアクションを実行するのかを指定し、runでステップ内で実行するコマンドを指定、name: はrunで実行するコマンドに名前を付けています。
今回だとuses: actions/checkout@v3でソースコードをclone、
- name: Set up Python 3.10
      uses: actions/setup-python@v3
      with:
        python-version: "3.10"
でPython3.10を使ってください宣言
name: Install dependencies
      run: |
        python -m pip install --upgrade pip
        pip install flake8 pytest
        if [ -f requirements.txt ]; then pip install -r requirements.txt; fi
でテストやLintで使用するライブラリやrequirements.txtに記載されているライブラリのinstall
name: Lint with flake8
      run: |
        # stop the build if there are Python syntax errors or undefined names
        flake8 . --count --select=E9,F63,F7,F82 --show-source --statistics
        # exit-zero treats all errors as warnings. The GitHub editor is 127 chars wide
        flake8 . --count --exit-zero --max-complexity=10 --max-line-length=127 --statistics
でLint(コードチェック)
 name: Test with pytest
      run: |
        pytest
でテストを実行
しています。
今回はデフォルトの設定のまま使って見ますが、中身を書き換えることで自分に合わせた設定を行うことができます。
Commit changes…という青いボタンを押してmainブランチに直接commitしましょう。
リポジトリのページに行くと.github/workflows/python-app.ymlができてることが確認できるでしょう。
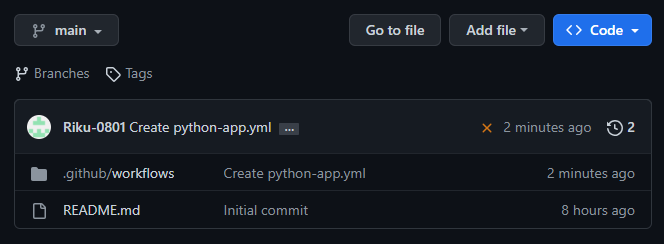
2 minutes ago の前に×がついていますね。これはtestの設定がまだ未完成だからです。次の節で追加してきます。
3. 使ってみる
今回はテストにpytestというライブラリを使用します。テストって大事ですよね。まあ僕ほとんど書いたことないんですけど。今回はGithub Actionsを使って見ることがメインの目的なので、テストの書き方等は割愛します。とりあえず動くテストが作れればいいので、一旦僕の真似してみてください。
def add(a, b):
    return a + b
from .mymodule import add
def test_mymodule():
assert add(1, 2) == 3足し算する関数とそれを確かめるテストですね。テストが動くことを確認できればいいので一旦これでいいでしょう。
.github/workflows/python-app.ymlの最後の部分を以下のように変更しましょう
 name: Test with pytest
      run: |
        pytest test.py
これでtest.pyが実行されるはずです。
ファイルの変更ができたら新しくdevelopブランチを作成してそこにpushしましょう。
git checkout -b develop
git add .
git commit -m "add"
git push origin develop
4. 確認
GitHubのリポジトリのページに移動して、developブランチからmainブランチへのpull requestを発行してください。
GitHub Actionsのワークフローが実行され、
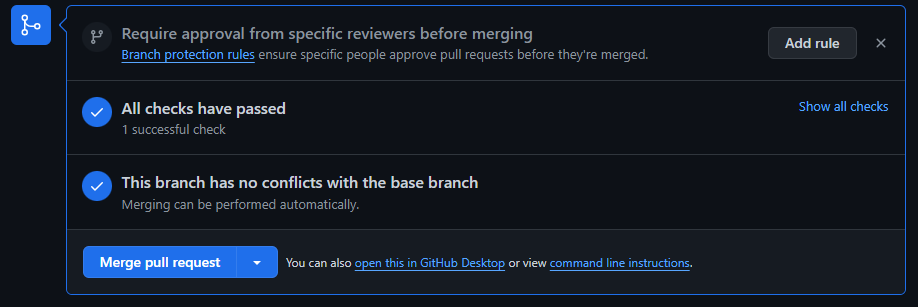
となるはずです。All checks have passedによってjobがすべて成功したことがわかります。
今回使用したリポジトリです。
https://github.com/Riku-0801/python_ci_cd
まとめ
いかがだったでしょうか?
今回はGithub Actionsを用いてCI/CDを体験してみました。(正確に言うとCIしかやってない)
かなり簡易的な内容しかやっていませんが、一通り流れのようなものはわかって頂けたら嬉しいです。
Github Actionsは使いこなせば便利な機能がたくさんあります。ぜひ使って見てください!